
A step-by-step tutorial to create a computer vision project that translates American Sign Language (ASL) letters using TensorFlow, Keras, OpenCV, and Streamlit.
In our increasingly digital world, technology has a profound role to play in fostering inclusivity. One of the most impactful applications of AI and computer vision is breaking down communication barriers. This tutorial will guide you through building a powerful and engaging project: a real-time sign language recognition web application.
We will create an app that uses your webcam to recognize American Sign Language (ASL) letters and translates them into text on your screen. This project is a perfect way to dive deep into the world of custom deep learning models, real-time video processing, and interactive web interfaces.
By the end of this guide, you will have learned how to:
- Train a custom Convolutional Neural Network (CNN) using TensorFlow and Keras on the popular Sign Language MNIST dataset.
- Perform real-time hand tracking and landmark detection with Google’s MediaPipe.
- Process live webcam feeds with OpenCV.
- Build an interactive web application with Streamlit to bring it all together.
Let’s get started!
Project Architecture: The Two-Part Plan
Our approach is straightforward and can be broken down into two main stages:
- Offline Model Training: First, we will train a deep learning model to understand and classify images of different ASL letters. We’ll use a well-known dataset, build a robust classifier, and save the trained model to a file.
- Real-Time Inference Web App: Second, we will build a user-friendly web interface. This app will access the user’s webcam, detect their hand in real-time, feed the hand gesture to our trained model, and display the predicted letter.
Step 1: Setting Up Your Development Environment
Before we write any code, we need to set up our project directory and install the necessary Python libraries.
First, create a new folder for your project and navigate into it:
mkdir sign-language-recognition-app
cd sign-language-recognition-app
Next, create a requirements.txt file to list our dependencies:
tensorflow
pandas
numpy
scikit-learn
streamlit
opencv-python
mediapipe
Now, install all these libraries in one go using pip:
pip install -r requirements.txtImportant note: if you faced the pip install error caused by Python dependency conflicts, read this blog to learn an effective solution: Navigating Dependency Hell: A Guide to Resolving Python Conflicts (Like the NumPy 2.0 Problem)
Step 2: Training the Sign Language Classifier
A smart application needs a smart “brain.” In our case, this is a Convolutional Neural Network (CNN) that we will train to recognize ASL letters.
The Dataset: Sign Language MNIST
We will use the Sign Language MNIST dataset, which is available on Kaggle. It’s a fantastic resource for this project because it’s already structured in a clean CSV format and contains 27,455 training images and 7,172 test images of ASL letters (A-Y). Note that the gestures for J and Z are excluded as they involve motion.
Action: Download the dataset from Kaggle. Place the sign_mnist_train.csv and sign_mnist_test.csv files in your project folder.
The Training Script (train_model.py)
Create a new Python file named train_model.py. This script will handle loading the data, preprocessing it, building the CNN, training it, and saving the final model.
Here is the complete, commented code:
# train_model.py

import pandas as pd
import numpy as np
import tensorflow as tf
from sklearn.model_selection import train_test_split
from tensorflow.keras.models import Sequential
from tensorflow.keras.layers import Conv2D, MaxPooling2D, Flatten, Dense, Dropout
from tensorflow.keras.utils import to_categorical

# --- 1. Load and Preprocess Data ---
print("Loading and preprocessing data...")

# Load the datasets from CSV files
train_df = pd.read_csv('sign_mnist_train.csv')
test_df = pd.read_csv('sign_mnist_test.csv')

# Separate labels (the letter) from features (the pixel values)
y_train = train_df['label'].values
y_test = test_df['label'].values
X_train = train_df.drop('label', axis=1).values
X_test = test_df.drop('label', axis=1).values

# Normalize pixel values to be between 0 and 1 for better model performance
X_train = X_train.astype('float32') / 255.0
X_test = X_test.astype('float32') / 255.0

# Reshape the data into 28x28 grayscale images (1 channel)
X_train = X_train.reshape(-1, 28, 28, 1)
X_test = X_test.reshape(-1, 28, 28, 1)

# One-hot encode the labels for multi-class classification
num_classes = len(np.unique(y_train)) + 1 # +1 to account for skipped labels if any
y_train = to_categorical(y_train, num_classes=num_classes)
y_test = to_categorical(y_test, num_classes=num_classes)

print("Data preprocessed successfully.")

# --- 2. Build the CNN Model ---
print("Building the CNN model...")

model = Sequential([
    Conv2D(32, (3, 3), activation='relu', input_shape=(28, 28, 1)),
    MaxPooling2D((2, 2)),
    Dropout(0.25),

    Conv2D(64, (3, 3), activation='relu'),
    MaxPooling2D((2, 2)),
    Dropout(0.25),

    Flatten(),

    Dense(128, activation='relu'),
    Dropout(0.5),
    Dense(num_classes, activation='softmax') # Output layer
])

model.compile(optimizer='adam',
              loss='categorical_crossentropy',
              metrics=['accuracy'])

model.summary()

# --- 3. Train the Model ---
print("\nStarting model training...")
history = model.fit(X_train, y_train,
                    epochs=20,  # Increased epochs for better accuracy
                    batch_size=64,
                    validation_data=(X_test, y_test),
                    verbose=1)

print("Model training completed.")

# --- 4. Evaluate and Save the Model ---
loss, accuracy = model.evaluate(X_test, y_test)
print(f'\nTest Accuracy: {accuracy*100:.2f}%')

model.save('sign_language_model.h5')
print("\nModel saved successfully as sign_language_model.h5")
Now, run the training script from your terminal:
python train_model.pyThis process will take a few minutes. Once it’s done, you will have a highly accurate model named sign_language_model.h5 ready to be used in our web app.
Step 3: Building the Real-Time Recognition Web App
This is where the magic happens! We’ll create a script that launches a web application using Streamlit.
The Web App Script (app.py)
This script will use OpenCV to capture video from your webcam and MediaPipe to detect the location of your hand in each frame. We then crop the hand, preprocess it just like we did during training, and pass it to our loaded model for a prediction.
Create a new file named app.py:
# app.py

import streamlit as st
import cv2
import numpy as np
import mediapipe as mp
from tensorflow.keras.models import load_model

# --- Load the Trained Model and Setup ---
st.set_page_config(page_title="ASL Recognition", layout="wide")

@st.cache_resource
def load_keras_model():
    """Load the Keras model from disk, cached for performance."""
    try:
        return load_model('sign_language_model.h5')
    except Exception as e:
        st.error(f"Error loading model: {e}")
        return None

model = load_keras_model()

# MediaPipe Hands setup
mp_hands = mp.solutions.hands
hands = mp_hands.Hands(max_num_hands=1, min_detection_confidence=0.7)
mp_drawing = mp.solutions.drawing_utils

# Class mapping from the dataset
class_names = ['A', 'B', 'C', 'D', 'E', 'F', 'G', 'H', 'I', 'K', 'L', 'M',
               'N', 'O', 'P', 'Q', 'R', 'S', 'T', 'U', 'V', 'W', 'X', 'Y']

# --- Streamlit UI ---
st.title("Real-Time ASL Letter Recognition")
st.write("Point your hand at the camera to see the magic happen! The model recognizes ASL letters A-Y.")

run = st.checkbox('Start Webcam', value=True)
FRAME_WINDOW = st.image([])

if model is None:
    st.warning("Model not loaded. Please ensure 'sign_language_model.h5' is in the directory.")
else:
    camera = cv2.VideoCapture(0)

    while run:
        ret, frame = camera.read()
        if not ret:
            st.error("Failed to capture image from camera.")
            break

        # Flip the frame for a selfie view and convert to RGB
        frame = cv2.flip(frame, 1)
        frame_rgb = cv2.cvtColor(frame, cv2.COLOR_BGR2RGB)

        # Process the frame with MediaPipe
        results = hands.process(frame_rgb)

        prediction_text = "No hand detected"

        if results.multi_hand_landmarks:
            for hand_landmarks in results.multi_hand_landmarks:
                # --- Bounding Box Calculation ---
                h, w, _ = frame.shape
                x_coords = [lm.x for lm in hand_landmarks.landmark]
                y_coords = [lm.y for lm in hand_landmarks.landmark]
                x_min, x_max = min(x_coords), max(x_coords)
                y_min, y_max = min(y_coords), max(y_coords)

                # Convert normalized coords to pixel coords with padding
                padding = 0.05
                x_min_px = int((x_min - padding) * w)
                x_max_px = int((x_max + padding) * w)
                y_min_px = int((y_min - padding) * h)
                y_max_px = int((y_max + padding) * h)

                # --- Preprocessing for Model Prediction ---
                try:
                    # Crop the hand region
                    hand_crop = frame[y_min_px:y_max_px, x_min_px:x_max_px]
                    # Convert to grayscale
                    hand_gray = cv2.cvtColor(hand_crop, cv2.COLOR_BGR2GRAY)
                    # Resize to 28x28 pixels
                    hand_resized = cv2.resize(hand_gray, (28, 28))
                    # Normalize and reshape for model input
                    hand_input = hand_resized.astype('float32') / 255.0
                    hand_input = np.reshape(hand_input, (1, 28, 28, 1))

                    # --- Prediction ---
                    prediction = model.predict(hand_input)
                    predicted_class_index = np.argmax(prediction)

                    # Ensure index is within the valid range of class_names
                    if 0 <= predicted_class_index < len(class_names):
                        predicted_class = class_names[predicted_class_index]
                    else:
                        # Handle cases where the model predicts a class index that doesn't map to A-Y
                        # This can happen if the num_classes in training was larger than 24.
                        # We can simply map any out-of-bounds index to an "Unknown" class.
                         predicted_class = 'Unknown'

                    confidence = np.max(prediction) * 100
                    prediction_text = f"Prediction: {predicted_class} ({confidence:.2f}%)"

                    # Draw bounding box and prediction text on the frame
                    cv2.rectangle(frame, (x_min_px, y_min_px), (x_max_px, y_max_px), (0, 255, 0), 2)
                    cv2.putText(frame, prediction_text, (x_min_px, y_min_px - 10),
                                cv2.FONT_HERSHEY_SIMPLEX, 0.9, (0, 255, 0), 2)

                except Exception as e:
                    # This handles errors if the hand is too close to the edge of the frame
                    pass

        # Display the resulting frame in the Streamlit app
        FRAME_WINDOW.image(cv2.cvtColor(frame, cv2.COLOR_BGR2RGB))
    else:
        st.write('Webcam stopped.')
        camera.release()
Step 4: Run Your Application!
You’re all set! To launch your sign language recognition app, run the following command in your terminal:
streamlit run app.pyYour web browser will automatically open a new tab with your running application. Click the “Start Webcam” checkbox, and you’re ready to go!
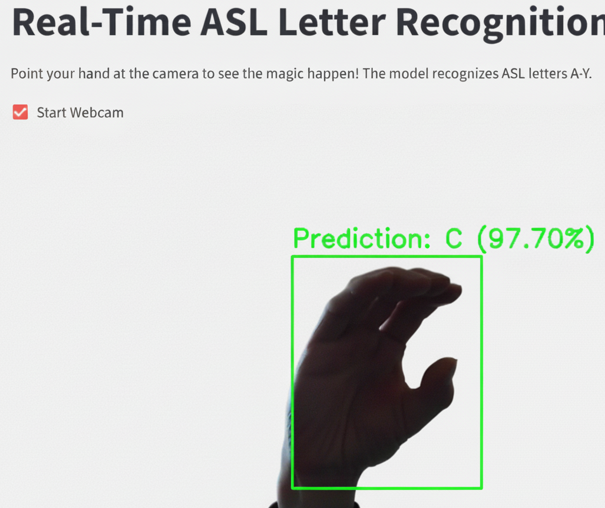
Figure: Sign Language Recognition App through Web Browser
Conclusion and Where to Go From Here
Congratulations! You have successfully built a complete, end-to-end deep learning application that recognizes sign language in real-time. You’ve learned how to train a neural network, process video streams, and create an interactive UI—a powerful combination of skills.
This project is just the beginning. Here are a few ideas to take it to the next level:
- Expand the Vocabulary: Collect or find data for words and phrases to build a more comprehensive translator.
- Recognize Dynamic Gestures: The letters ‘J’ and ‘Z’ involve motion. You could explore Recurrent Neural Networks (RNNs) or LSTMs to recognize these dynamic signs.
- Improve the UI: Add a feature that concatenates the predicted letters over time to spell out full words.
- Deploy Your App: Share your project with the world by deploying it using Streamlit Community Cloud or other hosting services.
Happy coding! If you have any questions or build upon this project, feel free to leave a comment below.
Leave a Reply